
when i was getting married i really wanted a brand new kitchenaid mixer in one of their fancy new colors. but i already had one that was handed down to me in perfect working order, so it just didn’t make sense to request a new one. i lived with the old standard issue almond color for years until i decided to simply paint it! though i was definitely nervous since i didn’t have money laying around to go buy a new one if it didn’t turn out well. i bit the bullet and just did it (back before we moved since i knew it would never get done with all our house projects), and it ended up being a fairly easy and quick project, and it may be my favorite project to date!

first i removed all the removeable parts, including the silver band, back cover, front disc and bottom plate. everything had screws so it was easy. i also removed the black side screws, but don’t do that! they have something to do with the motor, and it’s safer to just tape them off. (when i put my mixer back together it didn’t turn on! talk about heart dropping to the floor. it was because the parts in the black screws had to go back in just so and it wasn’t done correctly. fixed by ryan, phew). then i gave it and the removed parts a really, really good cleaning (i used a tsp substitute on the body of the mixer which is supposed to remove some of the glossy finish, then followed it up with soapy water). next i taped everything off that shouldn’t be painted. for the back motor area i covered it with a bag held on with a rubber band. i wrapped the beginning of the cord in tape and the excess was put in a plastic bag. then it was a thin coat or two of primer (i used gray since i was going dark) followed by a couple thin coats of the dark turquoise color (i used a gloss enamel paint thinking it might hold up better).
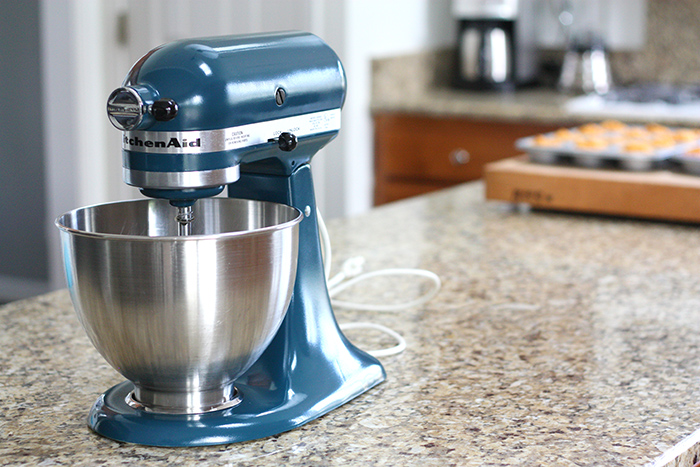


i am seriously in love with it. it almost looks factory made (nothing is absolutely perfect when diy-ing).
from blah to beautiful!


when we were getting married i would have chosen a green apple color. now, not so much. right now i’m loving the deep turquoise, but who know in a few years – but since it was fairly easy, i can change the color once i change my mind again! i’ll say it again, this might be my favorite project to date! the power of spray paint…
{justine}

gorgeous-wish I had your vision.
thanks so much for the kind words, gena!
Beautiful…what is TSP?
it’s a really strong cleaner, and in my stores i have only found a “tsp substitute”. all i know is a lot of the blog ‘experts’ use it!
Trisodium phosphate. the real stuff is very toxic, will cause skin rashes and should be handled only with rubber gloves, a smock, safety glasses and a dust mask. It’s a strong carcinogen. It’s also very bad for the environment. I would highly recommend using the substitute or just Mr. Clean if you do this. You can buy TSP, but you really shouldn’t mess with it.
Such a pretty color!! How is it holding up?
thank you! it has help up great – looks as good as when i first sprayed it.
This is perfect!! Great idea!!!!
thank you!
That is AWESOME!!! I have a white one that I have had for years. I always think it’s so boring and I wish for a new one (but would never waste the $). I am trying this for sure!! I just wont tell my hubby until after 😉
thanks so much! i hated the color of mine for years until i was like, why NOT paint it?? thankfully it turned out great! let me know if you do!
Pingback: art table: ikea latt hack | you're so martha
How did the cord change from almond color to white?
The cord didn’t change colors, even though it does look like it did. I think it’s because of the lighting (before pictures were with an overhead light on) and the change to a dark color that make the cord look whiter in the afters.
How is the color holding up? I’m thinking of doing this to mine. 🙂
Hi! It is holding up great! I’ve moved with it and used it many times, and it looks just as it did when I first painted it. Good luck!
If you were to do it again, would you still use the Rust-oleum Gloss Protective Enamel? Also, did it take one can or two? Lastly, how difficult was it to take off the metal band around the top?
Great job, btw. The color you chose looks fantastic!
Hi, Julia. Yes, I have been really happy with the Gloss Protective Enamel – there is no sign of wear yet. It took less than a can! And the metal band was not hard to get off. Thanks for stopping by!
Just painted mine tonite! Can’t wait for it to finish drying so I can put it back together 🙂 Love the color of your’s. I did mine plum
Awesome! Thanks for letting me know, I love hearing when people do projects inspired by my posts. Hope you love it!
Oh Justine it is so amazing and you are totally an inspiration! I have my Nan’s Almond Kitchen Aid also that I inherited. I was so excited when I was little and baking with her when she told me one day it would be mine (not really knowing what that meant) …. but then I started to see all the beautiful colors out there (when we were planning our registry). Although I am very sentimental, once I did get it I was kind of disappointed… not only in the color, but the condition. It was pretty banged up with nicks and chips. I thought about repainting, but thought it would be too daunting.
I don’t have a lot of storage in my really tiny kitchen so everything we have is “displayed”. But because it is so tiny it was affordable to redo it (mostly DIY) and make it newer…but Because everything was so I am sad to say…. I stored my Kitchen Aid away and I have never used mine
😦
I would LOVE to do this and be proud to show off my Nan’s Kitchen Aid (she was a baker, my Great Nan owned a bakery) so she deserves it showcased. I must do this for her mixer!
Just curious have you been able to replace any parts (if you needed to) on an older model like that? Also do you know if the newer parts (like the bread hook, whisks etc) are compatible with these models. Hey I might as well make it usable not just “display” worthy right? I will have to replace the wire though! Thank you for sharing this awesome fix!
What a great story! I love when “materialistic” things can have such meaning. Of course, you also want them to be able to work, as well as look good though. Fortunately I haven’t had any issues with it working, so I haven’t had to replace any parts – unfortunately I don’t have any help for you there. I don’t own a dough hook (yet), but I do have a paddle and a whisk and they seem like they are the same as current models, so I would think it’s all compatible. I’ve also used a shredder attachment and it worked fine. If yours is the same as mine, it seems like they are pretty similar to those sold new today. Hope yours turns out great and you can finally display and hopefully put it to use!
I have had a harvest gold that I’ve always hated . It is over 40 years old. I’m doing this. Any thoughts on decals
You should! Decals could look great! Good luck!
What a beautiful color and paint job. I just “inherited” (read found it in a junk pile) an avocado green (1970’s/1980’s) Kitchenaid mixer and will be painting it soon. I am waiting for a few parts and grease to arrive so I can put it all back together and then paint it. I was going to go with Rustoleum Cobalt Blue or Deep Blue but I love the color you used. I know you mentioned “turquoise” and “deep turquoise” but wanted to know if that was the exact Rustoleum name. Please let me know, if you would. Thank you and great job!
Hi, Mary. So exciting, love hearing about other’s painting theirs! I used Rustoleum Enamel in “Night Tide” gloss color. Thanks!
I have a Brand New KitchenAid (white) it’s just cheaper than buying a colored one, but always knew I wanted to recolor… But now I’m scared, and lots of questions … Saw your post and I’m now going for it… One question… Should I sand my mixer at all or find the tsp stuff ?
Hi! Yes, I would either lightly sand or use a TSP type cleaner – just so you’re removing some of the gloss so the paint will stick better. Prime it, then paint it! Good luck to you, hope you love it as much I do!
Help! I painted my mixer and had already taken out the side screws when I read your blog. How did you figure out how the are supposed to go? My heart stopped, too and now it’s beating really fast! :o)
Oh man, I feel you! I believe they fit in a certain orientation only, which helps – though I think there’s two-ways it fits in (it’s a rectangle shape if I remember correctly). So I first put them in and they fit! And then it didn’t work! And I freaked out! My husband took them out, looked in there with a flashlight I believe, and turned them to go in the other way they fit – and it worked again. Hope you figure it out and it turns out great!
Thanks for your help! I got it back together AND running. Now, I know to always consult your blog before I do anything! :o)
Good!!
Those are motor brushes, they are like this because it’s a replaceable part. I see you’ve resolved it. Nothing to panic about if they come out. They just need to be put back in with the curve on the end of the carbon brush oriented such that when you look at the mixer from the front you see the curve, and from above it’s the flat edge. To clarify, the brush is a black rectangular block about as wide as a pencil. The curve is where it rubs on the motor commutator, so the curve wraps around the motor’s axis of rotation, which runs along the body of the mixer.
I bought my kitchen aid a few years back at Costco for a huge discount, but unfortunately the only color they had was bright red. I have never been a bright red kind of girl and I’ve always wanted a different color but couldn’t justify spending that much money just to get a “pretty” color… Recently my aunt bought a new mixer in a beautiful teal color, my favorite color in fact. This reawakened my desire for a new color so when I ran across your post it gave me hope that maybe I wouldn’t have to buy a whole new mixer. I read the comments and I know people ask you this all the time, but how is it holding up? Now that it’s been a few years, has a chipped or scratched at all?
Hi! My mixer is holding up great! No chips, no scratches. The only thing wrong a couple years later is I may want a new color again 😉
I inherited a old but sturdy Kitchenaid from my sister. I saw this and was instantly inspired! After 2 days of cleaning,sanding and taping I got my first coat of red on today 😊 I must say it looks awesome! Thank you, I followed your directions because I thought the primer was important. Glad I did!
Oh I’m so excited for you! It’s amazing what a fresh coat of paint to get a fun color on a mixer can do for you 🙂
Hello, I love your color! Did you sand yours down at all before painting? Thank you for posting 🙂
Thank you. I did not sand – just used some TSP substitute cleaner to clean it and get some gloss off, then primed.
thanks for making this I just got handed down a white one and am going to paint it